Your token & Quantum Lab
Two extra tabs in the app: one to add liquidity for your own token (or launch its first pool), and a lab of experimental tools, some of them locked to whitelisted wallets.
Your token's liquidity
The $SQL tab (named after the token symbol in the config) finds the pools of any ERC-20 token on any of the 15 networks, opens them in the Builder to add liquidity, and, if the token has no pool yet, lets you launch one with a starting price you choose.
Setting your token
You have two options. You can paste any token address into the tab to try it, or you can set your own token once so it is pre-filled for everyone.
export const TOKEN_SYMBOL = "$SQL";
// Your token. Set it here or with NEXT_PUBLIC_TOKEN_ADDRESS / NEXT_PUBLIC_TOKEN_CHAIN at build time.
export const TOKEN_CONTRACT_ADDRESS = process.env.NEXT_PUBLIC_TOKEN_ADDRESS ?? "";
export const TOKEN_CHAIN = process.env.NEXT_PUBLIC_TOKEN_CHAIN ?? "base";
NEXT_PUBLIC_TOKEN_ADDRESS=0xYourTokenAddress NEXT_PUBLIC_TOKEN_CHAIN=base npm run build
Finding pools

- 1Network (with its logo).
- 2The token address. If the config has one, it is already here.
- 3Find pools.
Self-Quantum Liquidity checks that the address is a real ERC-20 on that network, then looks for the token against the network's wrapped native coin (for example WETH) and against USDC, in Uniswap v2, v3 and hookless v4.

- 1Every pool found.
- 2Builder →: add liquidity to that pool with the Builder.
For an existing v3 pool, click Builder → and use the normal create flow.
Launching a new pool
If no pool exists for your token (or none at the fee tier you want), the Launch a pool panel creates it and puts your first liquidity in, in one transaction.
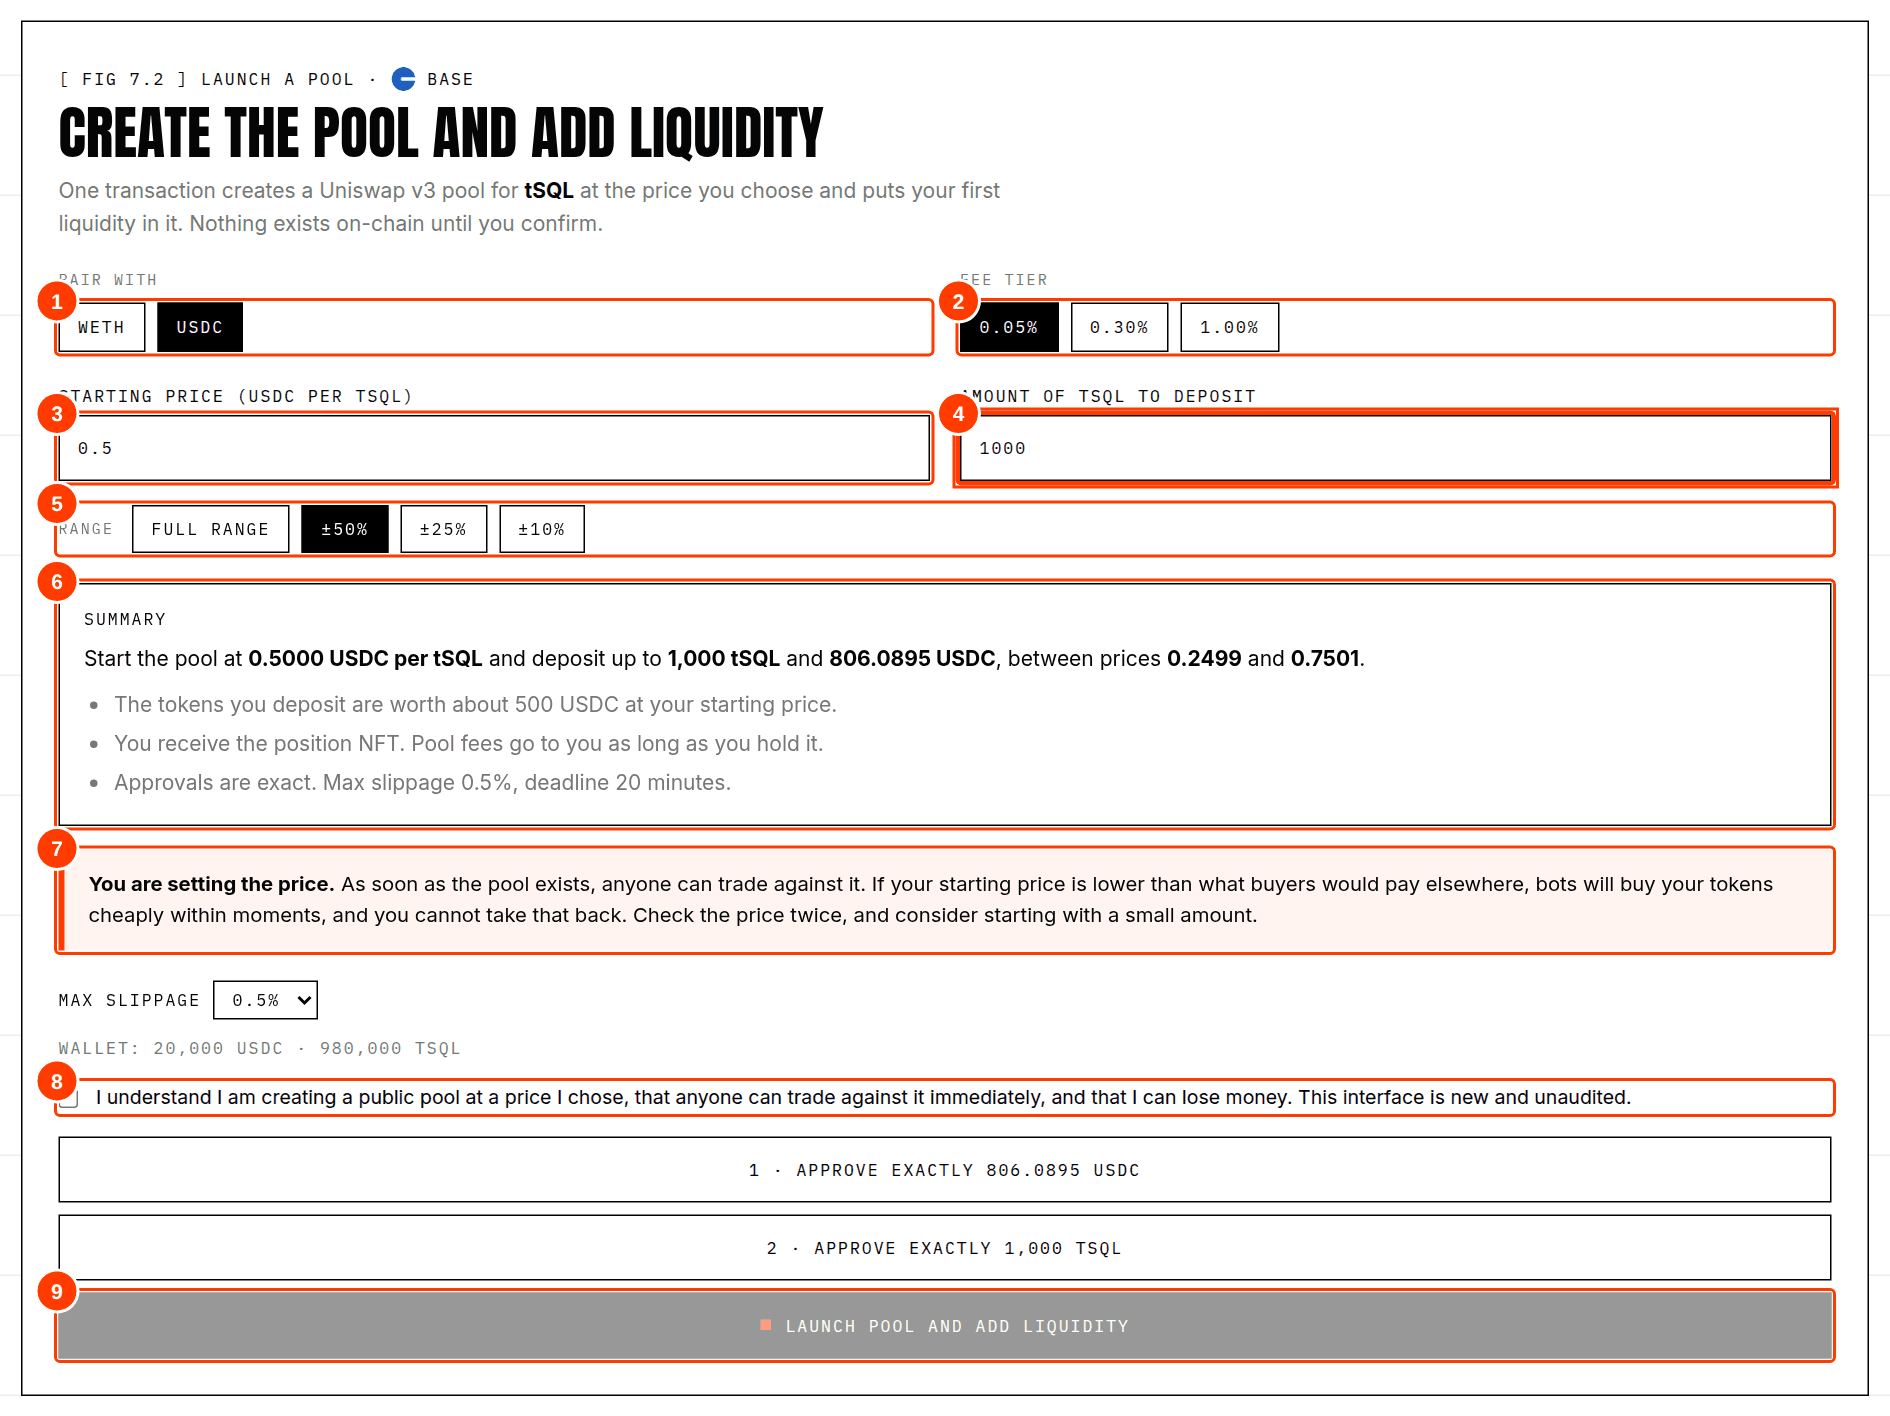
- 1Pair with: the network's wrapped native coin or USDC.
- 2Fee tier. Tiers that already have a pool for this pair are greyed out.
- 3Starting price: how many of the paired coin one of your tokens is worth.
- 4How much of your token to deposit.
- 5Range around the starting price, or full range.
- 6The summary: exactly what will be created and deposited.
- 7The price warning. Read it.
- 8The risk acknowledgement.
- 9Launch. It stays disabled until the box is ticked and approvals are done.
- Open the $SQL tab, choose the network and find your token.
- Choose what to pair it with, a fee tier, a starting price, a range and how much of your token to deposit.
- Read the summary and the price warning, and connect your wallet.
- Approve exactly the amounts shown (your token, and the paired coin unless you pay with native ETH).
- Tick the risk box and click Launch pool and add liquidity. Self-Quantum Liquidity simulates first, then asks your wallet to confirm.
- When it succeeds you get the position NFT. The pool now appears in the list above after a refresh.
What happens on chain
The transaction calls the Uniswap v3 position manager once, doing two things in order: createAndInitializePoolIfNecessary (creates the pool and sets its starting price) and mint (adds your liquidity and mints the position NFT to you). If you pay with native ETH it also wraps the ETH and refunds any excess. If someone creates the same pool at a different price first, the pool creation is skipped and your slippage limits stop the mint from going through at the wrong price.
Choosing a starting price
This is the most consequential number you will type. The starting price sets the token's market value from the first second.
| Step | Example |
|---|---|
| Decide the value you want the whole supply to have (fully diluted value) | $50,000 |
| Divide by the total supply | $50,000 ÷ 1,000,000 tokens = $0.05 per token |
| Convert into the coin you pair with | $0.05 ÷ $2,500 per ETH = 0.00002 WETH per token (or 0.05 USDC per token) |
| Balance the pool | Full range puts equal value on both sides: $5,000 of tokens (100,000) would need $5,000 of USDC |
- Too low and bots buy your tokens cheaply immediately. You cannot reverse that.
- Too high and nobody buys, and the first real trade may be you selling into your own price.
- Start small. You can add more liquidity later, in the same pool, with the Builder.
- Pair with the coin your buyers hold. WETH (or the network's native coin) is the most common; USDC makes the price easy to read.
Range and fee tier
- Full range is the simplest and safest for a new token: liquidity at every price, no need to watch it.
- ±50% / ±25% / ±10% concentrate your capital but stop earning when the price leaves, and a new token can move fast. Read Strategies first.
- Fee tier: 0.30% is the usual choice for a new token, 1.00% for very volatile ones, 0.05% for very liquid pairs.
Before and after you launch
- The token contract is verified on the block explorer and its code is what you expect.
- You know the total supply, who holds it, and whether the owner can mint more or pause transfers.
- You decided the starting price on purpose and double-checked the maths.
- You are starting with an amount you can afford to lose.
- You noted the token address, pool address and position number.
- You keep the position NFT in a wallet you control. Whoever holds it controls the liquidity.
Quantum Lab
The Lab is for ideas that are hard to explain in words. Each tool is labelled so you always know what you are looking at:
| Label | Meaning |
|---|---|
| PREVIEW | An interface for something that is not built. It shows the idea, it does not do it. |
| SYNTHETIC | Runs on made-up data, such as a random price path. |
| LIVE | Reads real, current on-chain data. |
| REAL MATH | The calculations are exact, using the Uniswap v3 formulas, even if the inputs are your assumptions. |
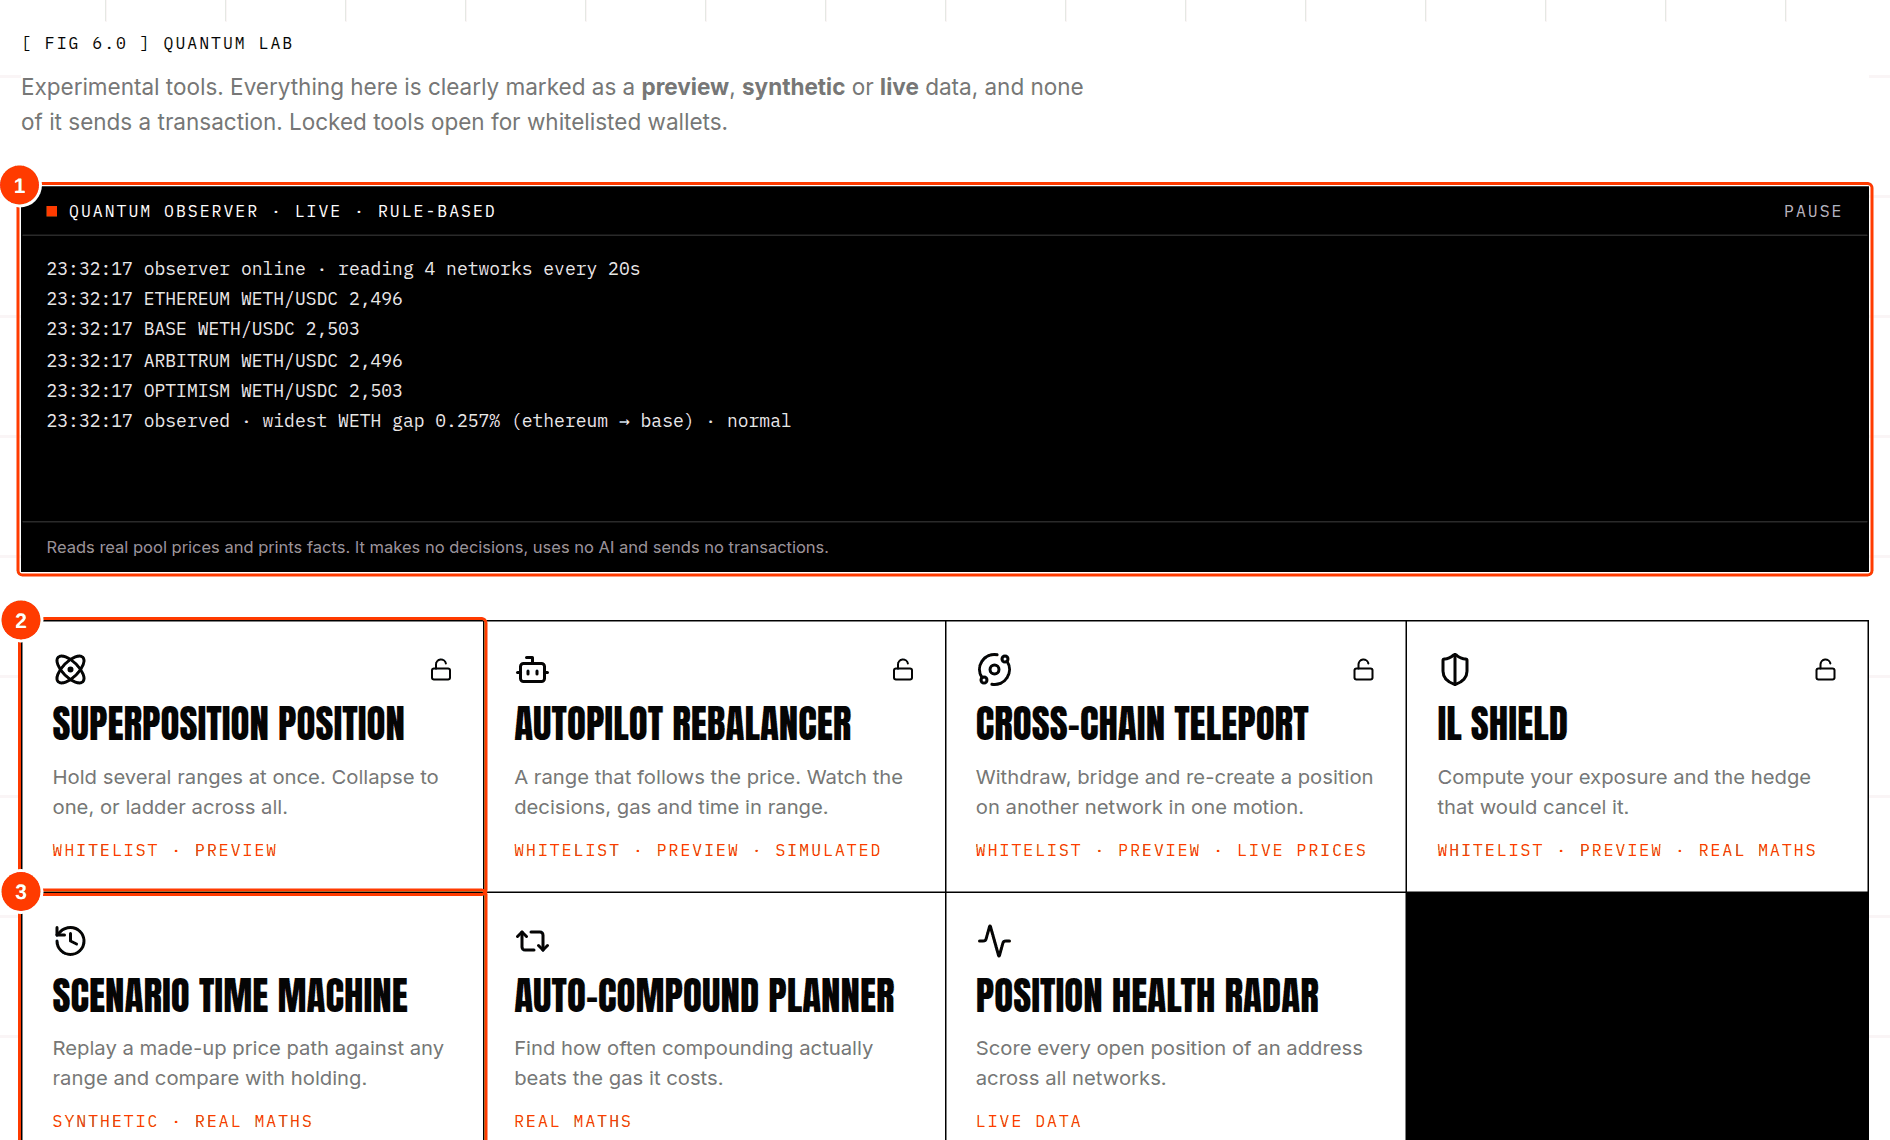
- 1The Quantum observer: a live, rule-based console.
- 2A locked tool (whitelist). Padlock closed unless a whitelisted wallet is connected.
- 3An open tool, available to everyone without a wallet.
The Quantum observer
A black console at the top of the Lab reads the live ETH price from the deepest v3 pools on four networks every 20 seconds and prints it, plus the widest gap between them. It follows simple rules (for example "gap above 0.3%"). It is not AI, makes no decisions and sends nothing.
The tools
| Tool | Access | What it is | What is real |
|---|---|---|---|
| Superposition position | Whitelist | Several candidate ranges with amplitudes. “Observe” collapses to one; Ladder splits capital across all. | The probabilities (amplitude squared), prices and capital efficiency. Nothing is deployed. |
| Autopilot rebalancer | Whitelist | A rule-based range that recentres when the price leaves it, with a decision log. | Nothing: a simulation on a random path. |
| Cross-chain teleport | Whitelist | Withdraw, bridge, re-create on another network. | The prices and pool counts it shows on both networks. No bridge exists. |
| IL shield | Whitelist | Your exposure to the asset across the price, and the hedge that would cancel it. | The exposure and hedge-size maths. No hedge can be activated. |
| Scenario time machine | Open | Replay a made-up price path against a range: hold vs position vs position with assumed fees. | The v3 value maths. The path and fee rate are assumptions. |
| Auto-compound planner | Open | Finds how often compounding beats its gas cost. | The maths. Your inputs are assumptions. |
| Position health radar | Open | Scores each open v3 position of an address from 0 to 100. | Everything: it reads real positions on all networks. |
How the health score works
- 50 points if the price is inside the range.
- Up to 35 points for how far the price is from the nearest edge (full marks at 25% of the range width).
- Up to 15 points for width: very narrow ranges lose points.
A low score only means “look at this position”. It is a rule of thumb, not advice.
Whitelisted tools
The four preview tools marked Whitelist are locked. Here is what visitors see.

- 1Connect Wallet: the only way forward.

- 1The message and the address that was checked.
- 2Disconnect, to try another wallet.
- Not connected: the lock says Connect Wallet.
- Connected but not whitelisted: it says the wallet is not on the whitelist and shows the address that was checked.
- Whitelisted: the tool opens. The locked tool is not even loaded until then.
Adding wallets to the whitelist
export const WHITELIST: string[] = [
  "0xYourWalletAddress",
  "0xAnotherApprovedAddress",
];
NEXT_PUBLIC_WHITELIST=0xabc…,0xdef… npm run build
If nothing is in the list, nobody (including you) can open the locked tools. Add your own address first.
These docs are educational. They are not financial, legal or tax advice. Providing liquidity carries risk, including loss of funds. Self-Quantum Liquidity is new software and has not been audited.