Using the app
A guided tour of every tab and button in the console, in the order you will use them. Open the app in another tab and follow along.
The layout in one minute
- Header: the SQL logo, a badge showing how many networks are covered, the Connect wallet button, and a link back to the site.
- Five tabs: Pools (find and compare pools), Builder (design a range and create a position), Positions (see what an address owns), the token tab and the Quantum Lab. The last two are covered in Your token & Quantum Lab.
- Everything is labelled. The small mono labels such as
[ FIG 3.1 ]number each panel, and these docs refer to them.
Pools: find the right pool
The Pools tab scans every network for the major pairs (each network's wrapped native asset against USDC, plus BTC where available) across Uniswap v2, v3 and hookless v4, and lists what it finds. It is the fastest way to answer "where is the deepest ETH/USDC pool?"
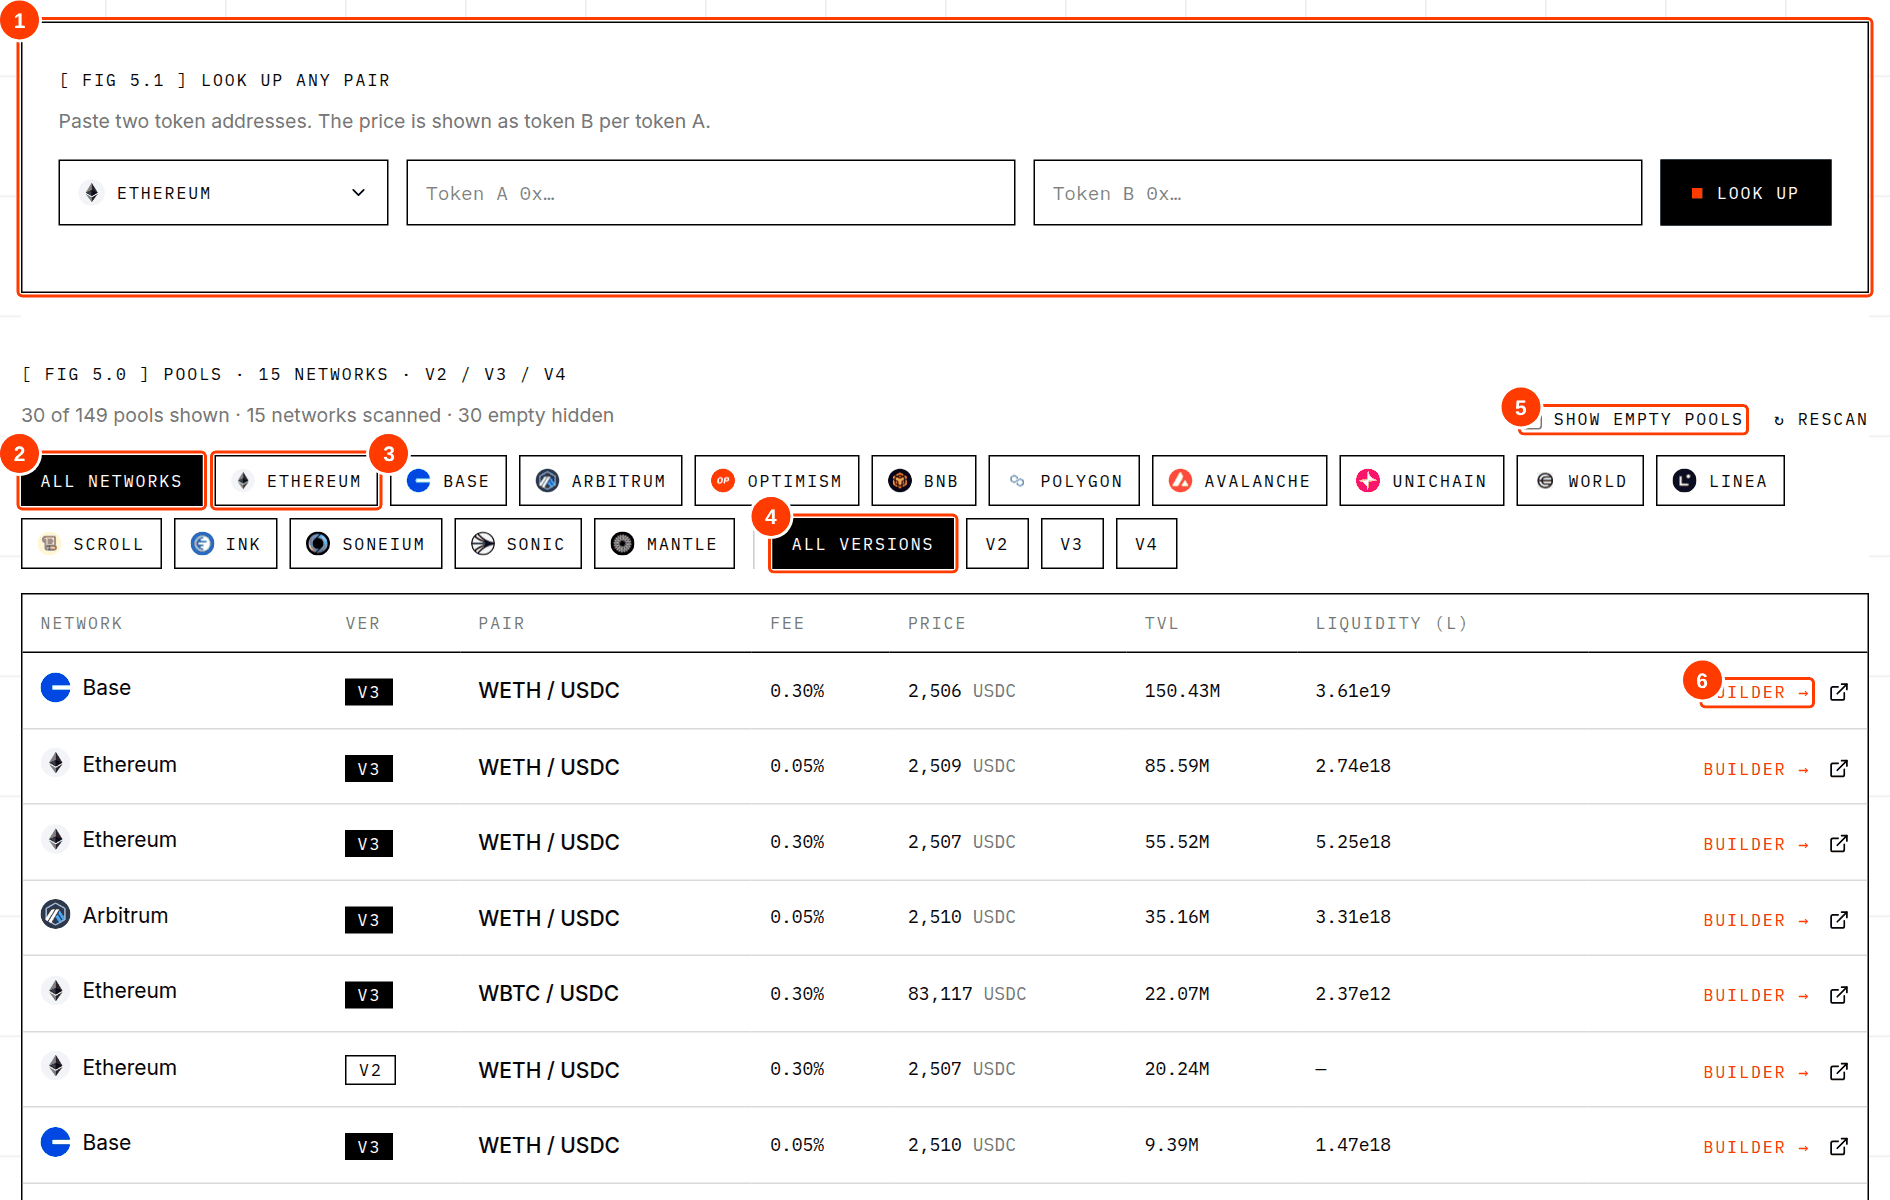
- 1Look up any pair (covered below).
- 2All networks chip.
- 3A single network chip with its logo.
- 4Version filter chips.
- 5Show empty pools toggle.
- 6Builder → button: open this pool in the Builder.
Reading a row
| Column | What it means | How to use it |
|---|---|---|
| Network | The blockchain the pool is on, with its logo. | Make sure it matches the network your wallet will use. |
| Ver | v2 v3 v4 | v3 pools are the ones you can create positions in from Self-Quantum Liquidity. |
| Pair | Base / quote asset. A small “native” tag means a v4 pool that uses the chain's native coin instead of the wrapped token. | The price is quoted as quote per base (for example USDC per ETH). |
| Fee | The pool's fee tier. | Deeper pools often sit in 0.05% or 0.30%. |
| Price | The pool's current price, read from the blockchain. | Compare across pools: large gaps mean one pool is stale or thin. |
| TVL | The value of the tokens held in the pool, expressed in the quote asset. | A rough measure of depth. A dash on v4 rows is normal (see below). |
| Liquidity (L) | The pool's active liquidity in Uniswap's internal unit. | Only meaningful for comparing pools of the same version and pair. It is not a dollar amount. |
Empty pools
Anyone can create a pool, so many pools exist with no value or no liquidity. Self-Quantum Liquidity hides those by default and says how many it hid. Switch on Show empty pools if you want to see them, for example to check whether a pool for your pair exists at all. Treat a price from a pool with no liquidity as meaningless.
Look up any pair
The scan only covers major pairs. For anything else, paste the two token addresses.
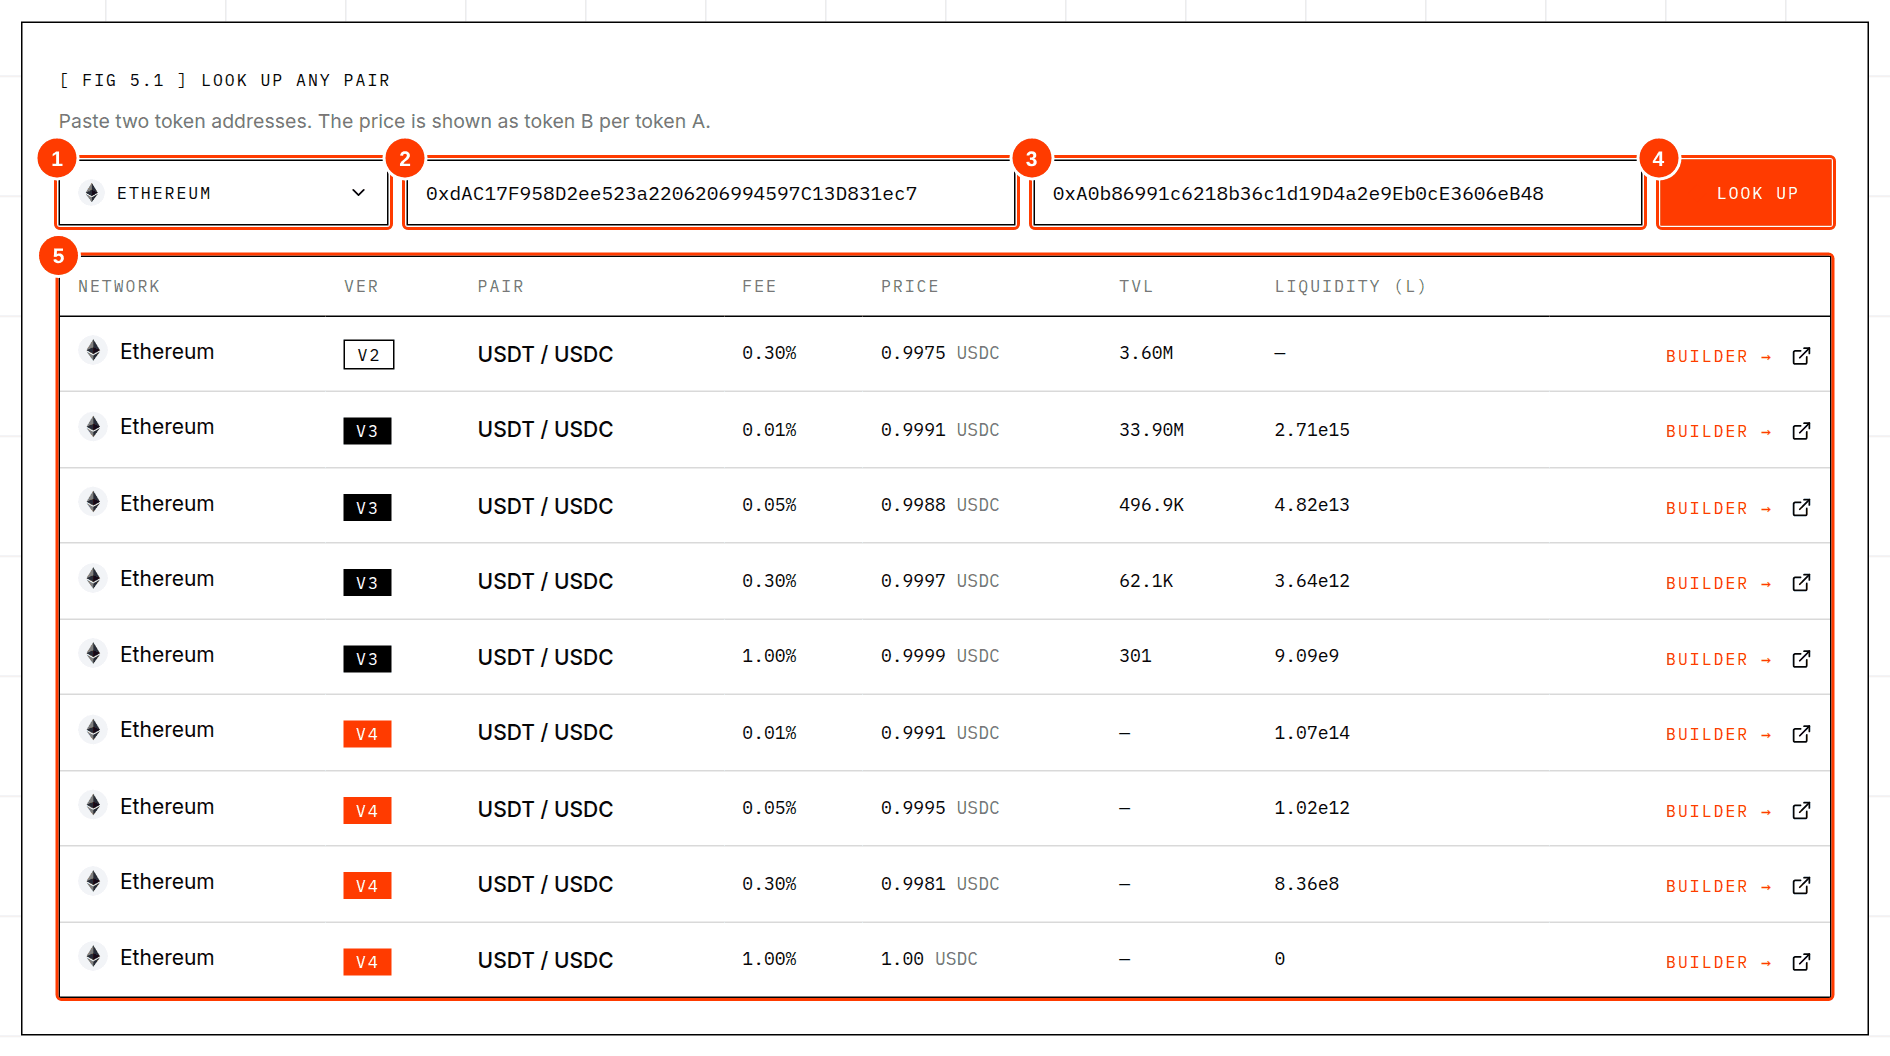
- 1Network picker.
- 2Token A address (the asset being priced).
- 3Token B address (the unit it is priced in).
- 4Look up button.
- 5Results: every v2, v3 and hookless v4 pool found for the pair.
Pick the network
Click the picker and choose the network where the tokens live. Each entry shows the network logo.
Paste both token addresses
Use the contract address of each token, not its name or ticker. Tickers can be faked.
Click Look up
Self-Quantum Liquidity first confirms both addresses are real ERC-20 tokens on that network, then looks for pools in v2, v3 and v4.
Read the result
The price is shown as token B per token A. Use Builder → to open any v3 or v4 result in the Builder.
Choosing a network
Wherever a network is chosen (Builder and Look up) you get a list with each network's logo.
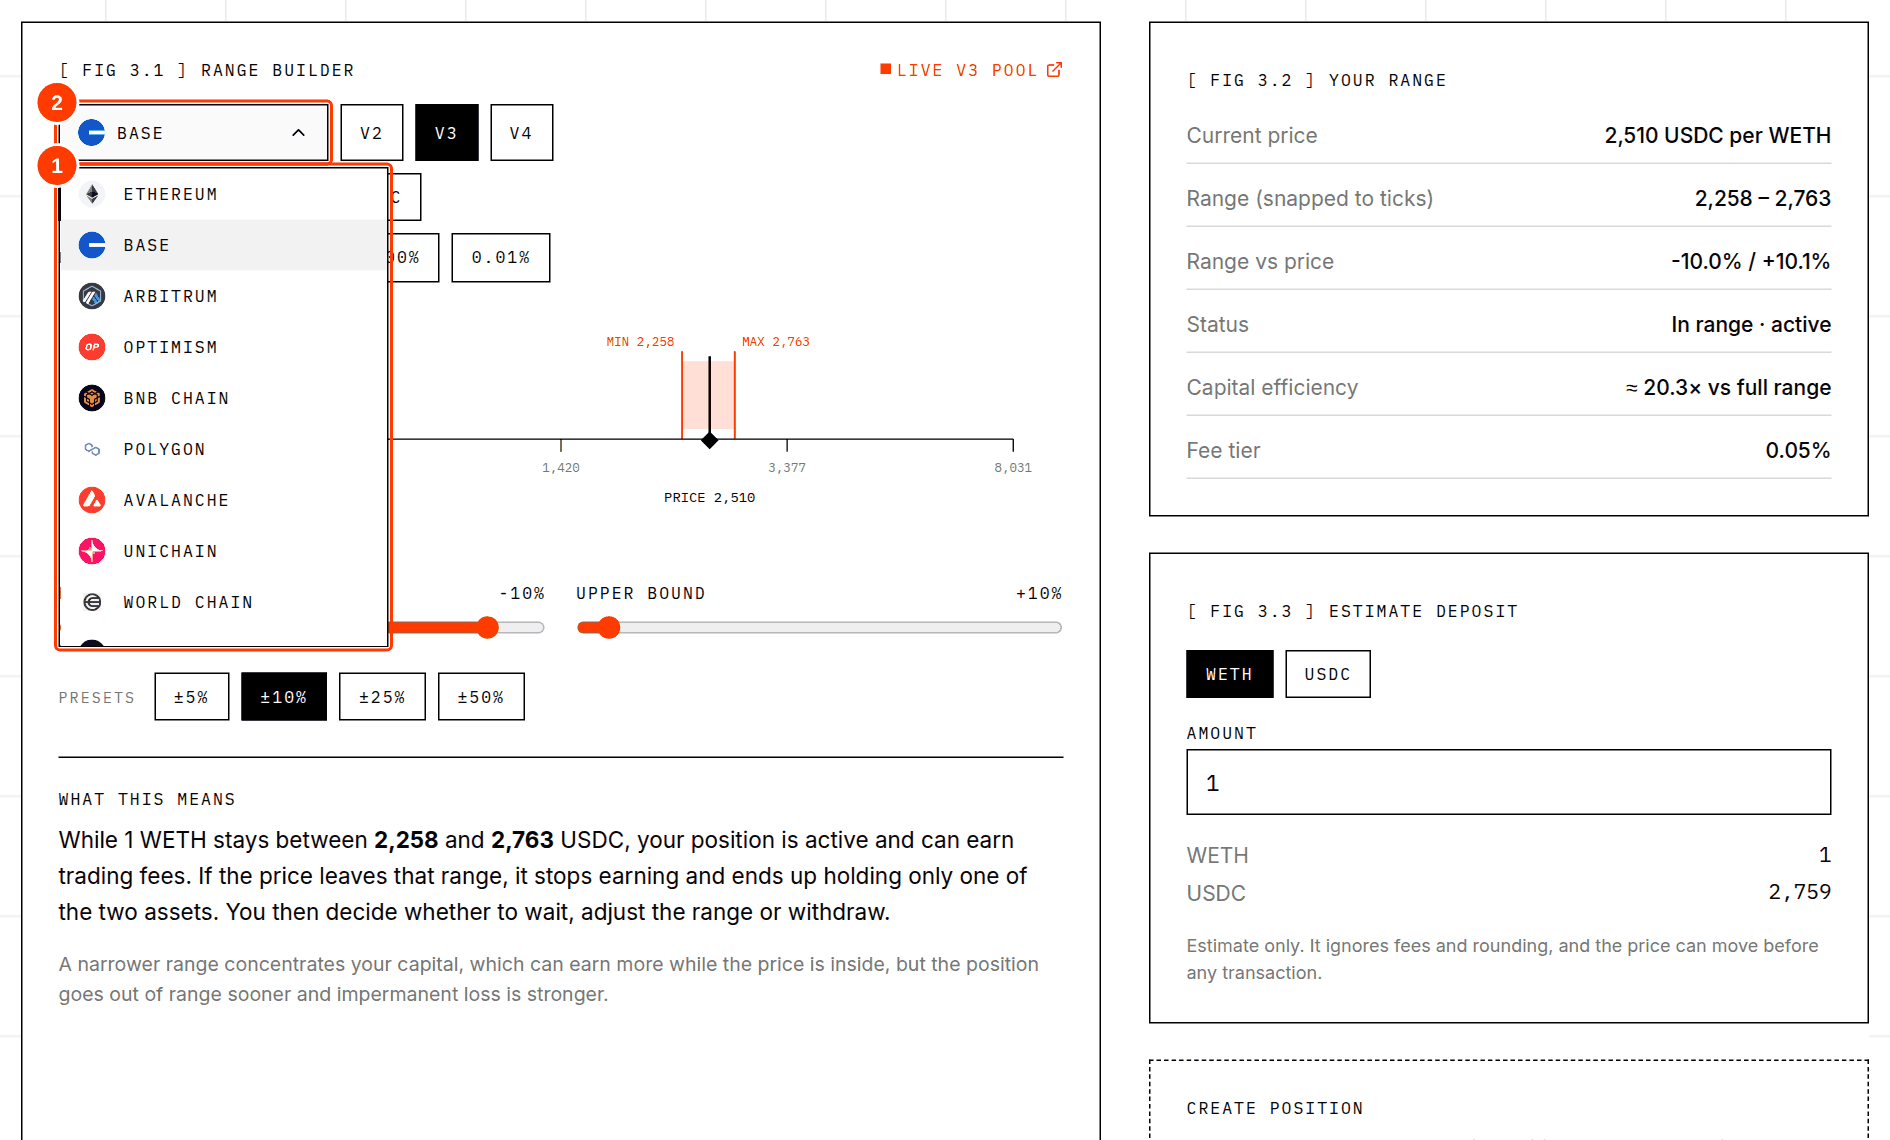
- 1The list of networks.
- 2The picker button showing the current network.
Not every network has every Uniswap version. If a version is not deployed on the network you chose, its button is greyed out and a tooltip says so. Scroll, Sonic and Mantle currently have only v3 in Self-Quantum Liquidity. See Networks & contracts for the full list.
Builder: design a range
The Builder turns the live state of a pool into a picture you can reason about. It is also where you create a position. Nothing in the first six controls below sends anything.
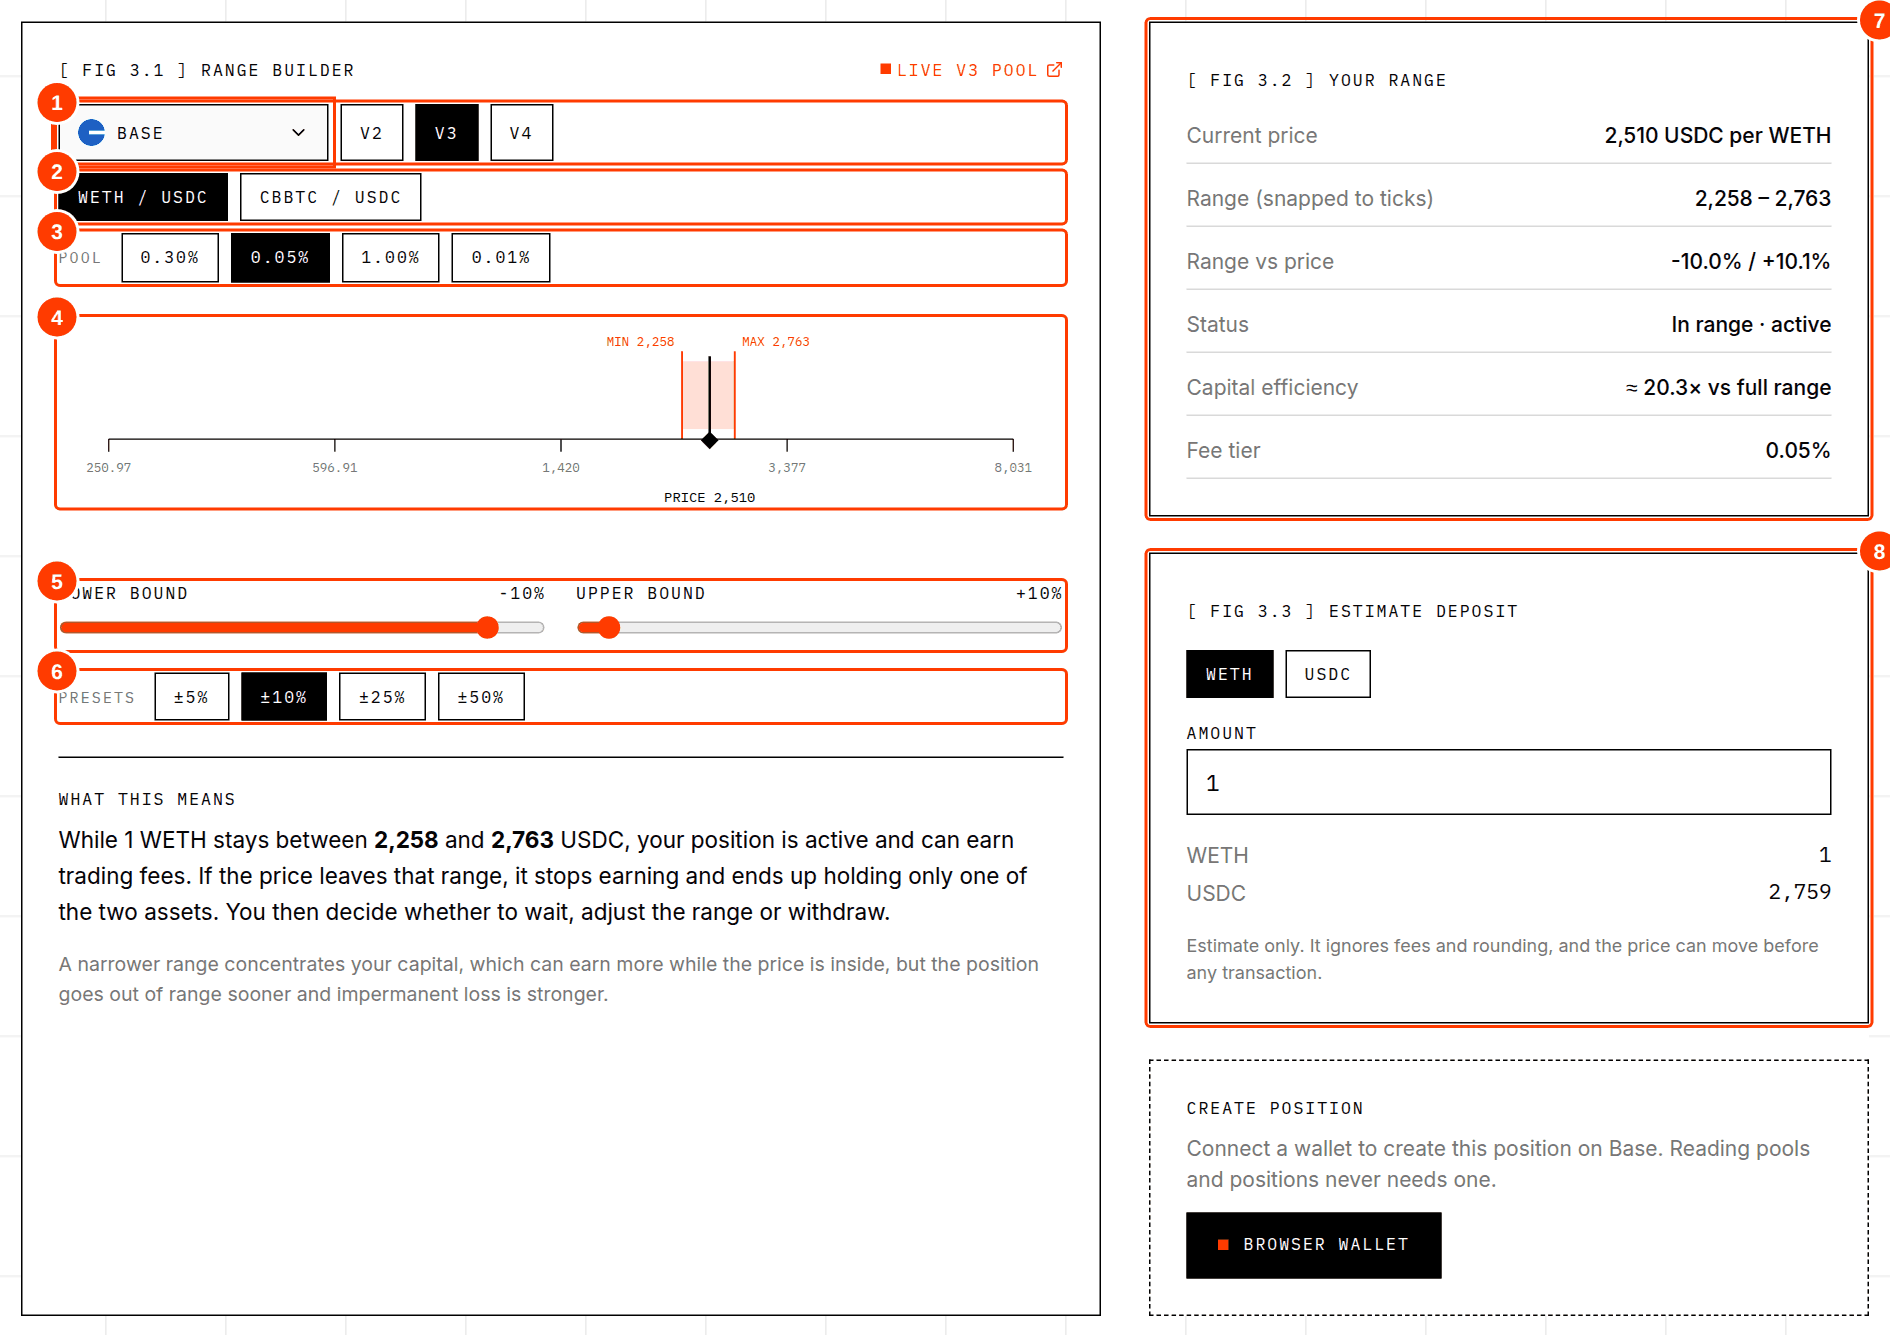
- 1Network and version.
- 2Pair: the curated pairs for this network, plus any pair you opened from a lookup.
- 3Pool: the existing pools for this pair, one per fee tier (and a “native” variant on v4).
- 4The price axis. The black marker is the current price; the orange band is your range.
- 5Lower and upper bound sliders, measured as a percentage away from the current price.
- 6Presets: ±5%, ±10%, ±25%, ±50%.
- 7Your range: the numbers behind the picture.
- 8Estimate deposit: how much of each token the range needs.
The right-hand panels
| Line | Meaning |
|---|---|
| Current price | The pool's price right now, quote per base. |
| Range (snapped to ticks) | Your range after rounding to the pool's allowed ticks. Always at least as wide as you asked for. |
| Range vs price | How far each edge is from today's price, in percent. |
| Status | “In range · active” means the current price is between your edges. |
| Capital efficiency | How many times more concentrated your liquidity is than a full-range position. Higher means more fees per dollar while in range, and more exposure to impermanent loss. |
| Fee tier | The pool's fee. |
Estimate deposit
Pick which token you want to type an amount for, then enter it. Self-Quantum Liquidity calculates how much of the other token the range needs at the current price. A range around the price always needs both tokens, in a ratio set by the range. The estimate ignores fees and rounding, and the price can move before any transaction, so the real amounts will differ slightly.
Connecting a wallet
You only need a wallet to create a position. Reading never requires one.
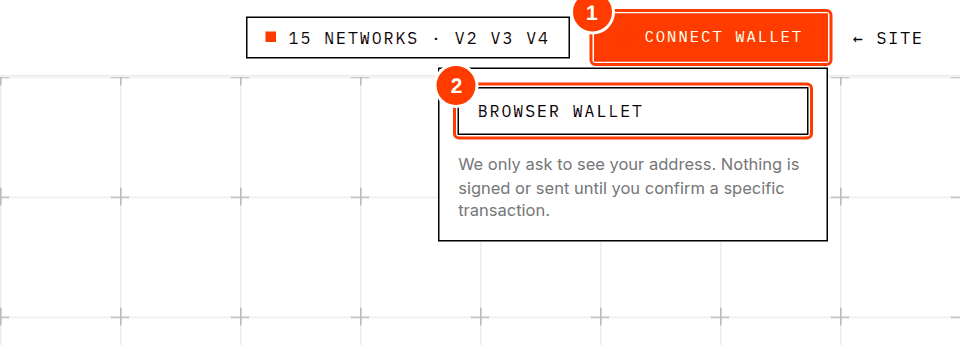
- 1Connect wallet button in the header.
- 2A detected browser wallet.
- Self-Quantum Liquidity asks only to see your address. It does not sign anything and cannot move funds by itself.
- If no wallet is detected, install a reputable one and reload. Self-Quantum Liquidity works with browser wallets that follow the standard EIP-6963 / EIP-1193 interfaces.
- The button then shows your shortened address and the logo of the network your wallet is on.
- Disconnect only makes Self-Quantum Liquidity forget the connection. To fully revoke a site's access, use your wallet's connected-sites setting.
If your wallet is on another network
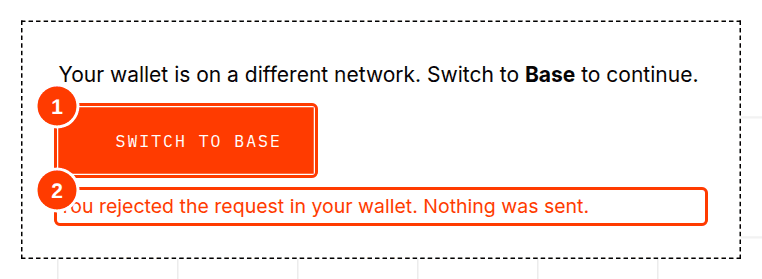
- 1Switch to the pool's network.
- 2If you reject the request in your wallet, Self-Quantum Liquidity says so and nothing is sent.
Creating a Uniswap v3 position
Pick a v3 pool and a range
In the Builder choose the network, v3, a pair and a fee tier. Set your range and type an amount to deposit.
Connect your wallet
The Create position panel under the estimate asks you to connect. If your wallet is on a different network, use Switch.
Read the summary
Before any button appears Self-Quantum Liquidity spells out what it is about to do: how much of each token, into which pool, between which prices, who receives the NFT, which contract gets the approvals, the slippage limit and the deadline.
Choose slippage and native ETH
Max slippage (0.1%, 0.5%, 1% or 2%) protects you if the price moves between your click and the transaction being mined. Lower is stricter but the transaction may fail more often. Pay with ETH (shown when one token is the wrapped native coin) uses your plain ETH and wraps it for you; any excess is refunded.
Tick the risk box
The checkbox is deliberate friction. Create position stays disabled until you tick it and until any needed approvals are done.
Approve exactly what is needed
For each token that is not paid in native coin, Self-Quantum Liquidity shows a button such as Approve exactly 557.2789 USDC. Your wallet will ask you to confirm that approval. Check that the amount in the wallet matches, and that the spender is the Uniswap position manager shown in the summary.
Create the position
Self-Quantum Liquidity simulates the transaction first and only then asks your wallet to send it. When the wallet shows the request, read it, then confirm. The button shows progress while it waits for the network.
Revoke any leftover approval
Self-Quantum Liquidity gives the second token a 1% safety margin so the amount you typed is the limiting side. Anything not spent stays approved, so after success a Revoke leftover approval button appears. Click it to set that allowance back to zero.
Check the result
Open the Positions tab and use Use my wallet. Your new position appears with its status.
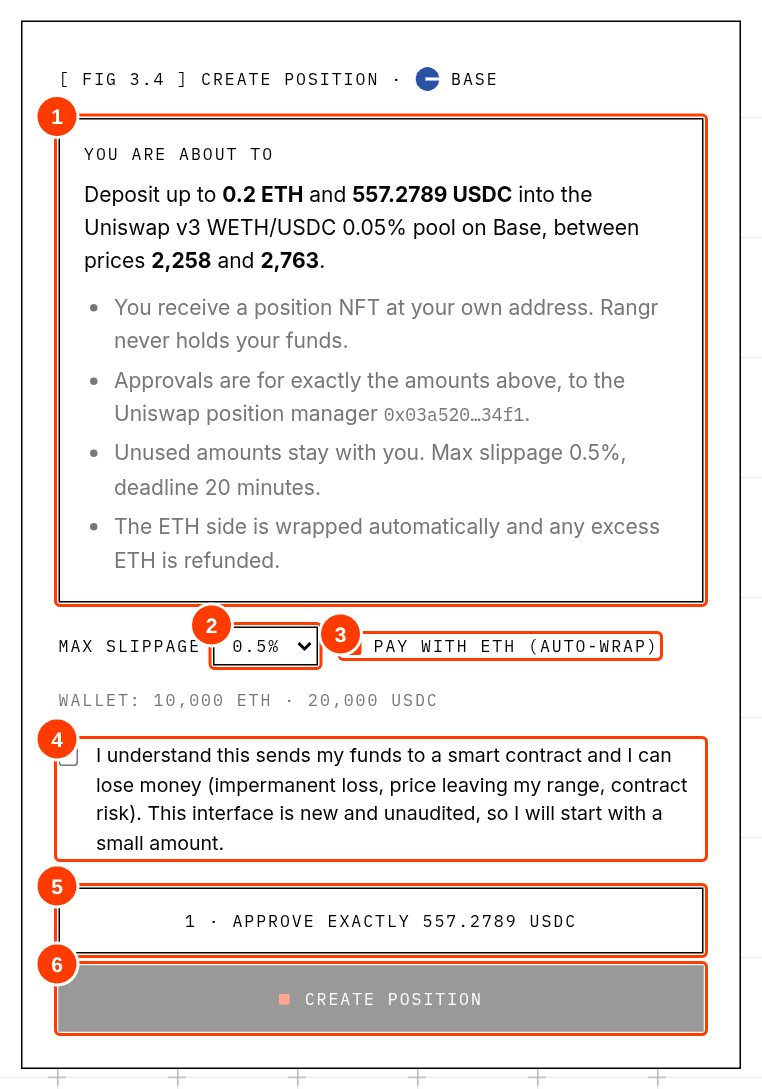
- 1The plain-language summary of the transaction.
- 2Max slippage selector.
- 3Pay with ETH (auto-wrap) checkbox.
- 4The risk acknowledgement.
- 5Approval button for the second token, for exactly the needed amount.
- 6Create position (disabled until the box is ticked and approvals are done).
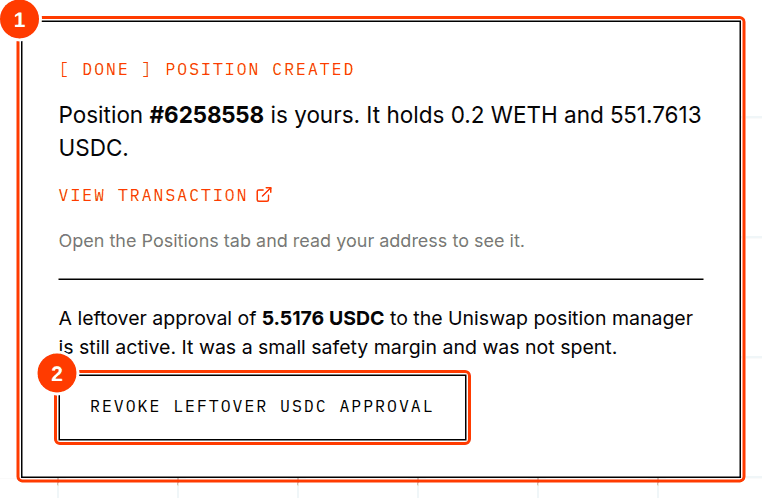
- 1Confirmation with the position's NFT number and the amounts deposited.
- 2Revoke the unspent safety-margin approval.
What you will see in your wallet
| Prompt | What it is | What to check |
|---|---|---|
| approve | Gives the Uniswap position manager permission to spend an exact amount of one token. | Token, spender address and the amount match the app. Not “unlimited”. |
| mint | Creates your position and pulls in the two tokens. | Network, and that gas is reasonable. |
| multicall (with ETH value) | Shown instead of mint when you pay with native ETH: it wraps the ETH, mints, then refunds the excess. | The ETH amount attached is what you expected. |
| approve (amount 0) | The optional revoke of leftover allowance. | Amount is 0. |
Gas is paid in the network's native coin on each transaction. Fees vary by network and by how busy it is, and they are generally far lower on layer-2 networks than on Ethereum mainnet.
Positions: see what an address owns
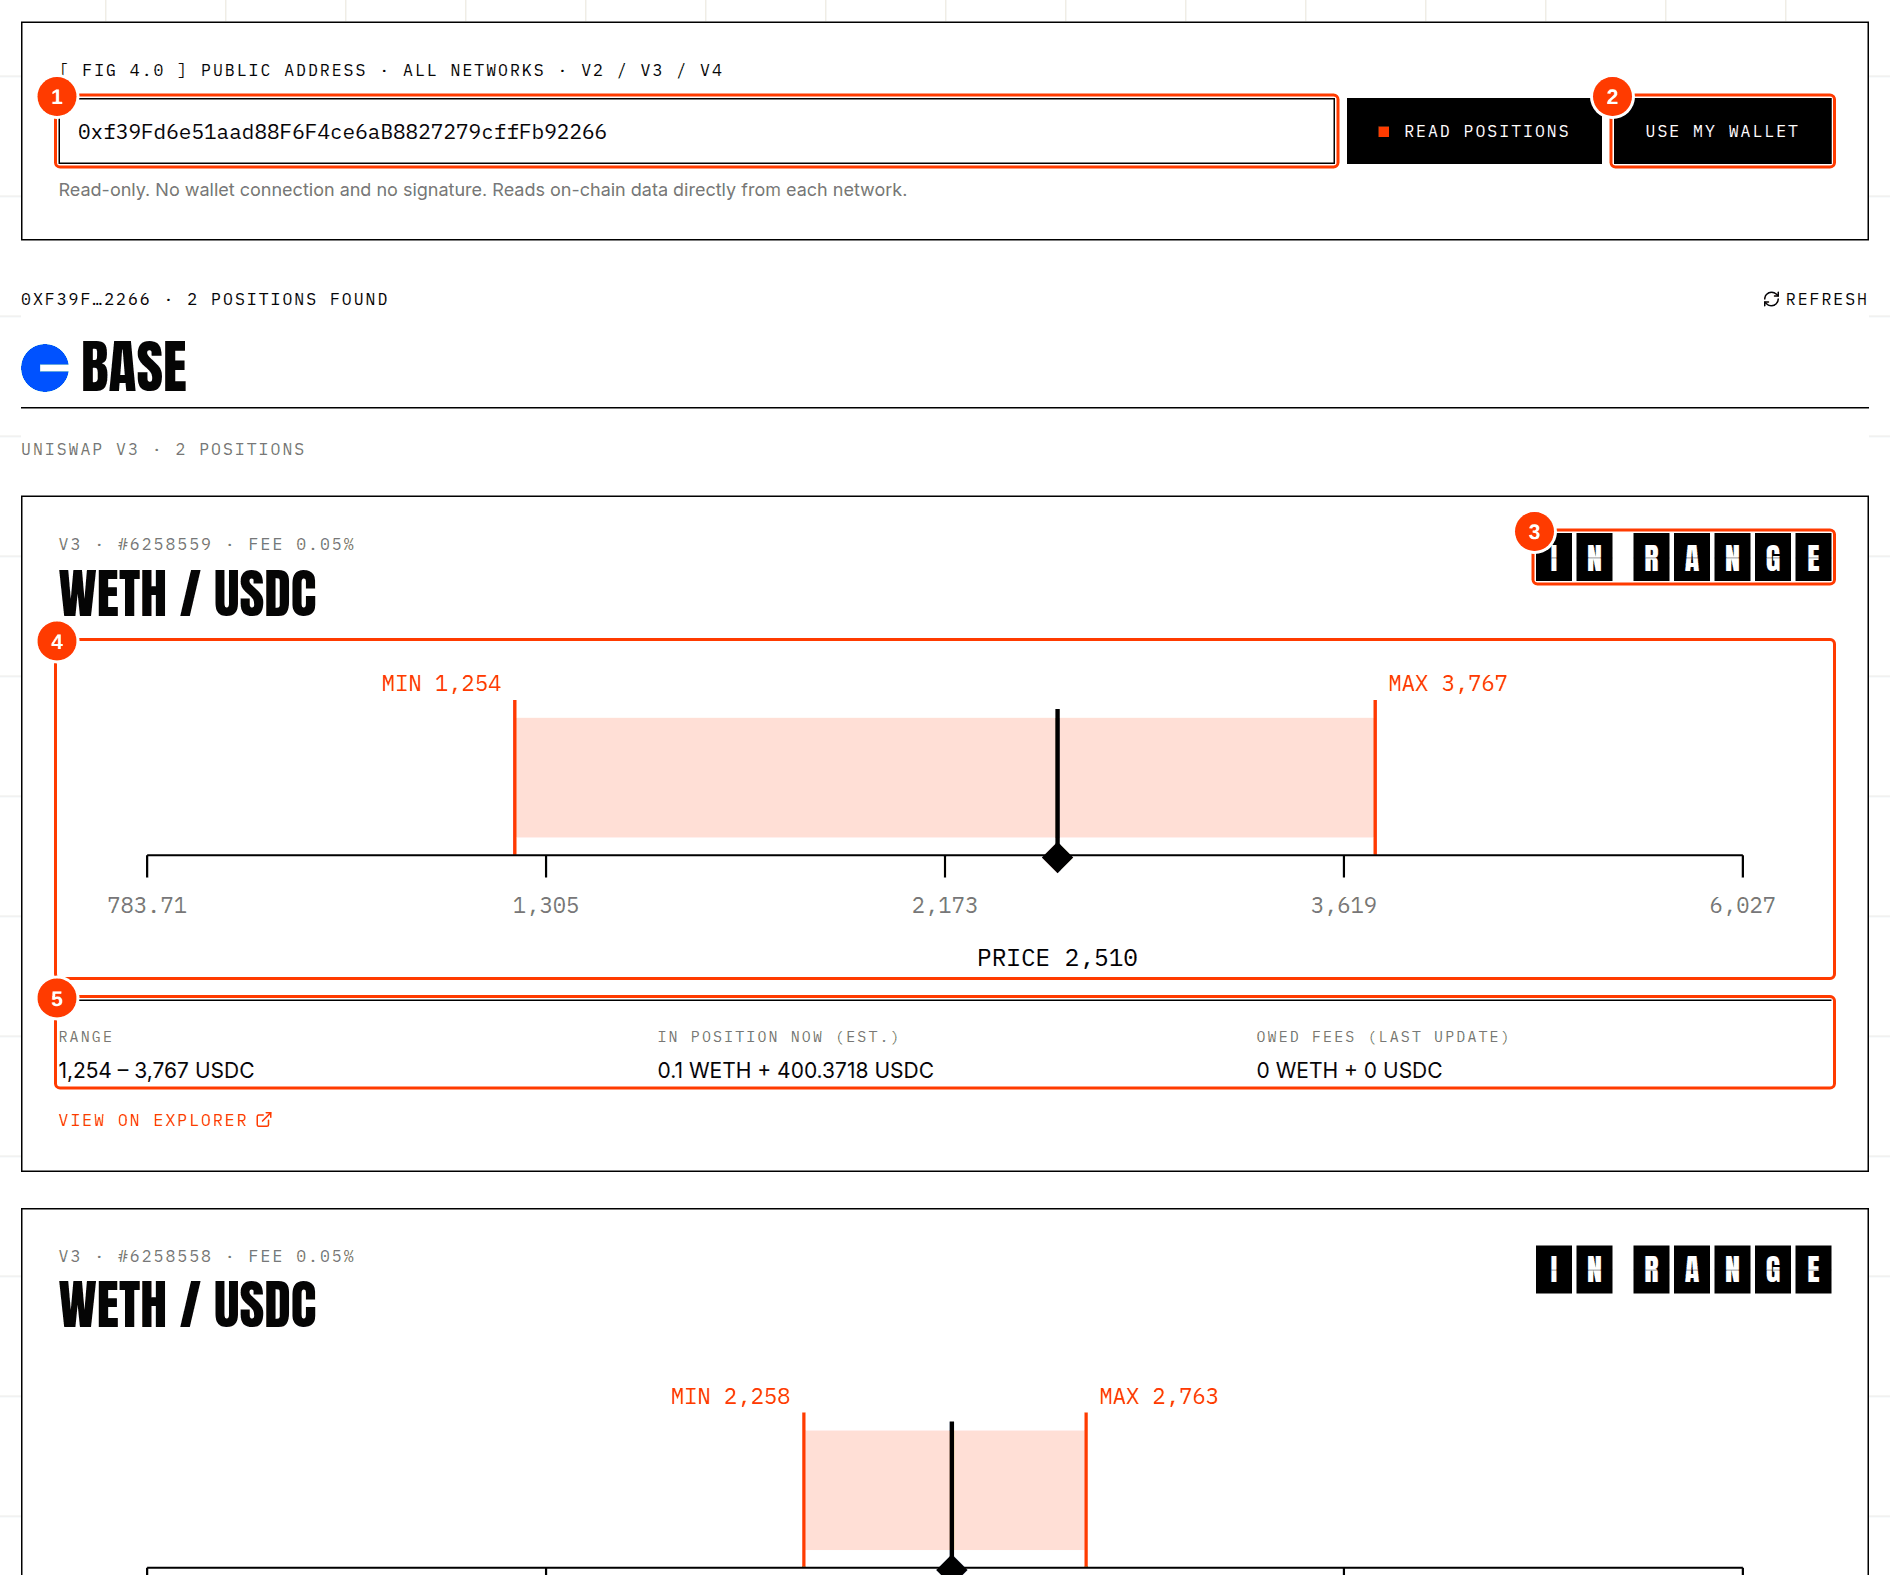
- 1Public address to read. Any address works.
- 2Use my wallet fills the address from your connected wallet.
- 3Status tiles: IN RANGE, OUT OF RANGE or CLOSED.
- 4The price axis with the position's range and the current price.
- 5The details: range, estimated amounts and owed fees.
- Per network sections: results are grouped under each network's logo and name. Networks with nothing to show are skipped.
- Uniswap v3: every position NFT the address owns, newest first (up to 25 per network are shown). Each has a status, its range on the axis, an estimate of the tokens currently inside, and the fees recorded as owed.
- Uniswap v2: shown only for the major pairs, as a share of the pool with estimated amounts. Finding every v2 LP token an address holds would need an indexer.
- Uniswap v4: Self-Quantum Liquidity shows how many v4 position NFTs the address owns, with a link to the explorer. Details need an indexer.
- Estimates: amounts are calculated from on-chain liquidity and the current price. Owed fees only include what the contract has recorded and may be higher.
| Status | Meaning | What you might do |
|---|---|---|
| IN RANGE | The current price is inside the position's range. It is earning fees. | Nothing, or monitor. |
| OUT OF RANGE | The price is outside. No fees, one asset only. | Wait, adjust the range, or withdraw. |
| CLOSED | The position has zero liquidity (it was withdrawn). | Collect any owed fees, then you can burn the empty NFT. |
Adjusting, collecting and withdrawing
Self-Quantum Liquidity does not yet change or close positions. Until it does, use the Uniswap interface or the contract directly. In outline, closing a v3 position is three steps: decrease liquidity (to zero, which makes the tokens withdrawable), collect (to send the tokens and fees to your wallet), and optionally burn the now-empty NFT. The Developer guide has the code.
- Open the Uniswap interface for the same network and connect the same wallet.
- Find your position and remove 100% of the liquidity.
- Collect the tokens and fees and confirm.
- Come back to the Positions tab: the position should show CLOSED.
What Self-Quantum Liquidity knows about you
- Self-Quantum Liquidity has no accounts and no database. It does not store your address or your positions.
- Your browser talks to public blockchain endpoints (RPC providers) to read data. Those providers can see your IP address and the addresses you query, as with any website that reads the blockchain. If that matters to you, use a VPN or a privacy-preserving setup.
- Connecting a wallet shares your address with the page for that tab only. Disconnecting forgets it.
These docs are educational. They are not financial, legal or tax advice. Providing liquidity carries risk, including loss of funds. Self-Quantum Liquidity is new software and has not been audited.